嵌入式系统移植之Linux内核移植
移植linux内核 v5.4.79
1. 在linux官网下载 https://www.kernel.org/
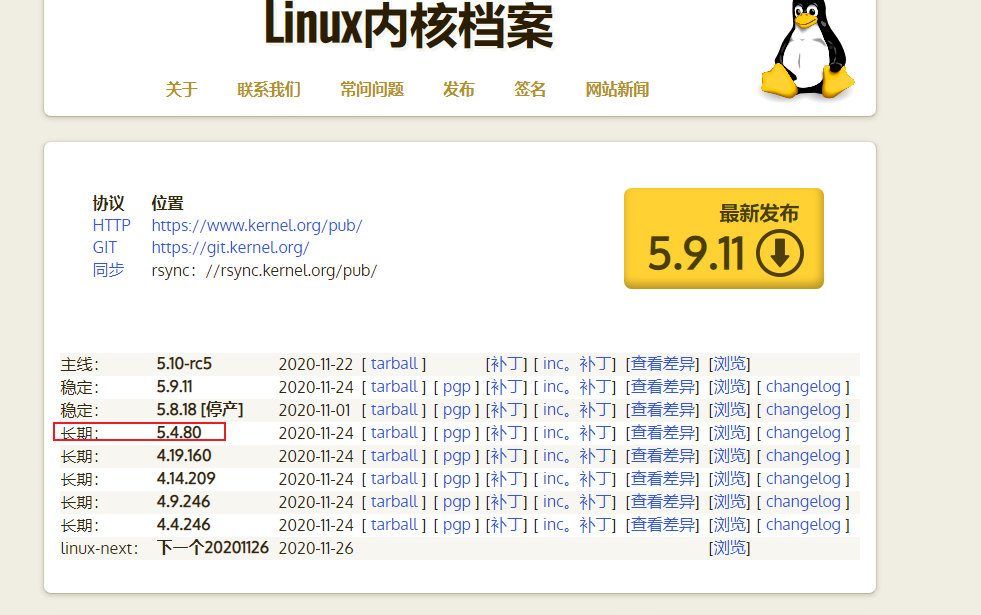
2. tar -vxf 解压
3. 进入arch/arm/configs文件夹 查找适配开发板的config文件。

4. 清除原配置,配置Makefile
	make ARCH=arm distclean

修改 源码顶层目录的 Makfile

	ARCH ?= arm
	CROSS_COMPILE ?= arm-none-linux-gnueabi-
5. 导入配置(配置列表见 arch/arm/configs/  找最类似的)
不修改linux-5.4.79/Makefile
直接执行 make ARCH=arm exynos_defconfig


此处可能会因为缺少安装包而报错,对应处理方案如下:
问题1:缺少flex
/bin/sh: 1: flex: not found
scripts/Makefile.host:9: recipe for target 'scripts/kconfig/lexer.lex.c' failed
make[1]: *** [scripts/kconfig/lexer.lex.c] Error 127
Makefile:590: recipe for target 'exynos_defconfig' failed
make: *** [exynos_defconfig] Error 2
解决方案:
apt-get install flex

问题2: 缺少bison
/bin/sh: 1: bison: not found
scripts/Makefile.host:17: recipe for target 'scripts/kconfig/parser.tab.h' failed
make[1]: *** [scripts/kconfig/parser.tab.h] Error 127
Makefile:590: recipe for target 'exynos_defconfig' failed
make: *** [exynos_defconfig] Error 2
解决方案:
sudo apt-get install bison
6. 配置内核 make ARCH=arm menuconfig

此处可能会因为缺少安装包而报错,对应处理方案如下:
错误1:
scripts/kconfig/Makefile:208: recipe for target 'scripts/kconfig/mconf-cfg' failed
make[1]: *** [scripts/kconfig/mconf-cfg] Error 1
Makefile:591: recipe for target 'menuconfig' failed
make: *** [menuconfig] Error 2
解决方案:
sudo apt-get install ncurses-dev

System Type  --->
 [*] Samsung EXYNOS  --->
[ ]   SAMSUNG EXYNOS3
[*]   SAMSUNG EXYNOS4
[ ]   SAMSUNG EXYNOS5
  *** EXYNOS SoCs ***
 -*-   SAMSUNG EXYNOS4210
[ ]   SAMSUNG EXYNOS4212
[*]   SAMSUNG EXYNOS4412
[ ]   SAMSUNG EXYNOS4415
退出 保存
7. 编译内核 uImage
make -j6 ARCH=arm CROSS_COMPILE=arm-none-linux-gnueabi-
编译将会生成  zImage
进入目录 linux-5.4.79/arch/arm/boot
执行命令将 zImage 制作成 uImage
mkimage -A arm -O linux -T kernel -C none -a 0x41000000 -e 0x41000040 -n "aaa" -d zImage uImage

此处可能会因为缺少安装包而报错,对应处理方案如下:
错误1:
scripts/extract-cert.c:21:10: fatal error: openssl/bio.h: No such file or directory
 #include <openssl/bio.h>
          ^~~~~~~~~~~~~~~
compilation terminated.
scripts/Makefile.host:107: recipe for target 'scripts/extract-cert' failed
make[1]: *** [scripts/extract-cert] Error 1
Makefile:1124: recipe for target 'scripts' failed
make: *** [scripts] Error 2
解决方案:
sudo apt install libssl-dev

错误2:没有配置写入地址
This is incompatible with uImages
Specify LOADADDR on the commandline to build an uImage
arch/arm/boot/Makefile:90: recipe for target 'arch/arm/boot/uImage' failed
make[1]: *** [arch/arm/boot/uImage] Error 1
arch/arm/Makefile:342: recipe for target 'uImage' failed
make: *** [uImage] Error 2
解决方案:注意该地址应与 开发板pri环境变量中指定uImage位置相匹配
make uImage LOADADDR=0x41000000
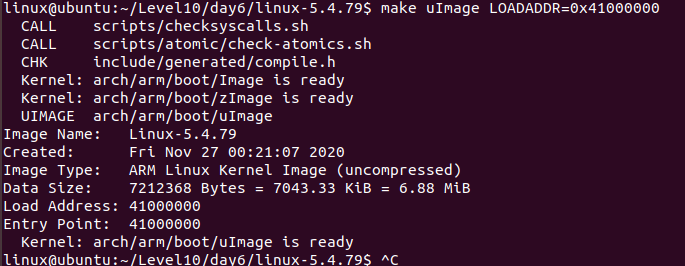
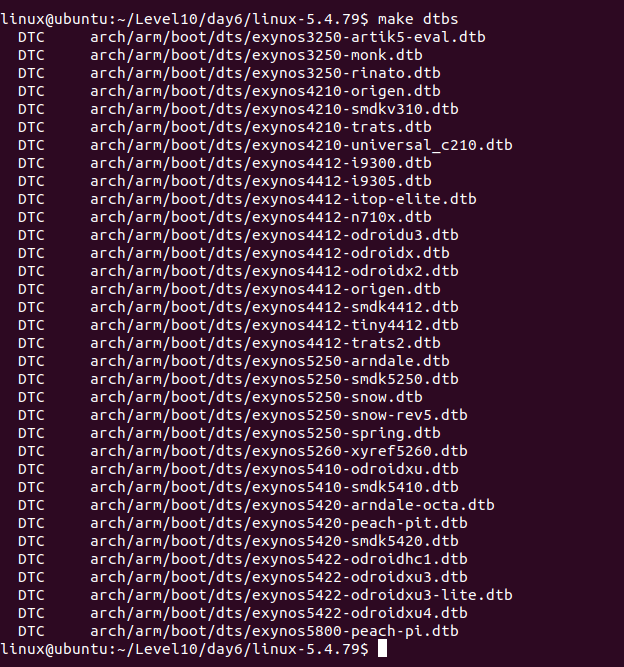
8. 编译设备树 make ARCH=arm dtbs
9. 上传到NAS,观测效果。
使用 linux-5.4.79/arch/arm/boot/uImage  和
linux-5.4.79/arch/arm/boot/dts/exynos4412-origen.dtb
至此没有异常的话可以正常启动 linux,
但是挂载不了根文件系统,因为没有配置网卡驱动
10. 配置网卡驱动
make ARCH=arm menuconfig
[*] Networking support  --->
	Networking options  --->
		<*> Packet socket
		<*>Unix domain sockets
		[*] TCP/IP networking
		[*]   IP: kernel level autoconfiguration
Device Drivers  --->
	[*] Network device support  --->
		[*]   Ethernet driver support (NEW)  --->
		<*>   DM9000 support
File systems  --->
	[*] Network File Systems (NEW)  --->
		<*>   NFS client support
		[*]     NFS client support for NFS version 3
		[*]       NFS client support for the NFSv3 ACL protocol extension
		[*]   Root file system on NFS
11. 配置时钟
这部分不是必须修改的 要看内核,先执行上面9步,如无法正常启动,
并报错s5m-rtc s5m-rtc: hctosys: unable to read the hardware clock,可尝试一下修改:

修改文件driver/clk/clk.c
static bool clk_ignore_unused;
改为static bool clk_ignore_unused = true;
12. 结果展示:
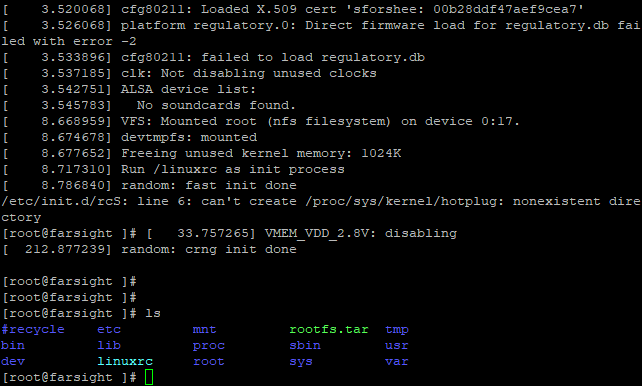
网卡移植之设备树信息分析
1.设备树简介
所谓设备树DeviceTree ,就是CPU与设备连接描述。
用于管理 硬件拓扑和硬件资源信息。
Device Tree由一系列被命名的结点(node)和属性(property)组成,而结点本身可包含子结点。
所谓属性,其实就是成对出现的name和value。
相关链接
Linux DTS(Device Tree Source)设备树详解之一(背景基础知识篇)
https://e-mailky.github.io/2019-01-14-dts-1
Linux DTS(Device Tree Source)设备树详解之二(dts匹配及发挥作用的流程篇)
https://e-mailky.github.io/2019-01-14-dts-2
Linux DTS(Device Tree Source)设备树详解之三(高通MSM8953实例分析篇)
https://e-mailky.github.io/2019-01-14-dts-3
2.平台设备
CPU与设备连接描述 - 平台设备
在内核里有一个结构“struct machine_desc”,内核用这个结构表示一个实际存在的板子,而针对每个板子都会有一个文件定义这个结构体,这个文件叫平台代码;
    如:arch/arm/mach-s5pv21/mach-smdkv210.c(3.14版本内核中没有基于Exynos4412的平台代码,这里以s5pv210为例)
	MACHINE_START(SMDKV210, "SMDKV210")
		/* Maintainer: Kukjin Kim <kgene.kim@samsung.com> */
		.atag_offset	= 0x100,
		.init_irq	= s5pv210_init_irq,
		.map_io	= smdkv210_map_io,
		.init_machine	= smdkv210_machine_init,
		.init_time	= samsung_timer_init,
		.restart	= s5pv210_restart,
		.reserve	= &smdkv210_reserve,
	MACHINE_END
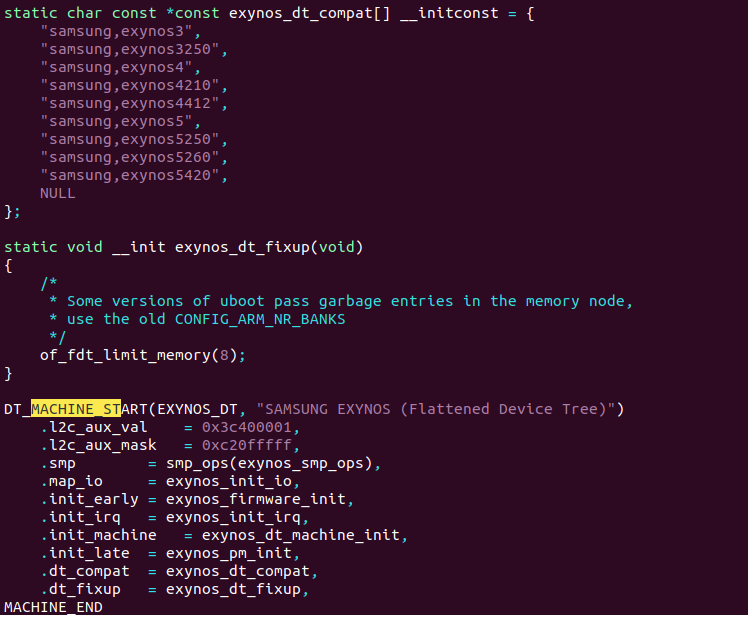
5.4版本基于Exynos4412的平台代码如下:
3.网卡移植 平台相关
srom-cs1@5000000 {
/* 第一部分 是描述CPU内部总线的信息 */
    compatible = "simple-bus";
    #address-cells = <1>;
    #size-cells = <1>;
    reg = <0x5000000 0x1000000>;    //总线地址,总线长度


/* 以下为第二部分 是描述网卡信息 */
    ethernet@5000000 {
        compatible = "davicom,dm9000";  内核通过该名字来匹配驱动
        reg = <0x5000000 0x2 0x5000004 0x2>;  寄存器地址和数据宽度
        interrupt-parent = <&gpx0>;   继承于 中断控制器gpx0
        interrupts = <6 4>; 6  对应中断源 DM9000_IRQ -> XEINT6 。4对应 active high level-sensitive
        davicom,no-eeprom;
        mac-address = [00 0a 2d a6 55 a2];
    };

/* 树状结构,如有必要, 可在这之下挂载更多的设备信息*/
};
-
总线地址 总线长度的确认
找到网卡芯片DM 9000 的电路图,找到片选CS#引脚对应的接口 BUF_Xm0cs1

继续在外围电路中搜索该引脚,发现接到了一颗转换芯片上,找到转换过后的接口 Xm0cs1
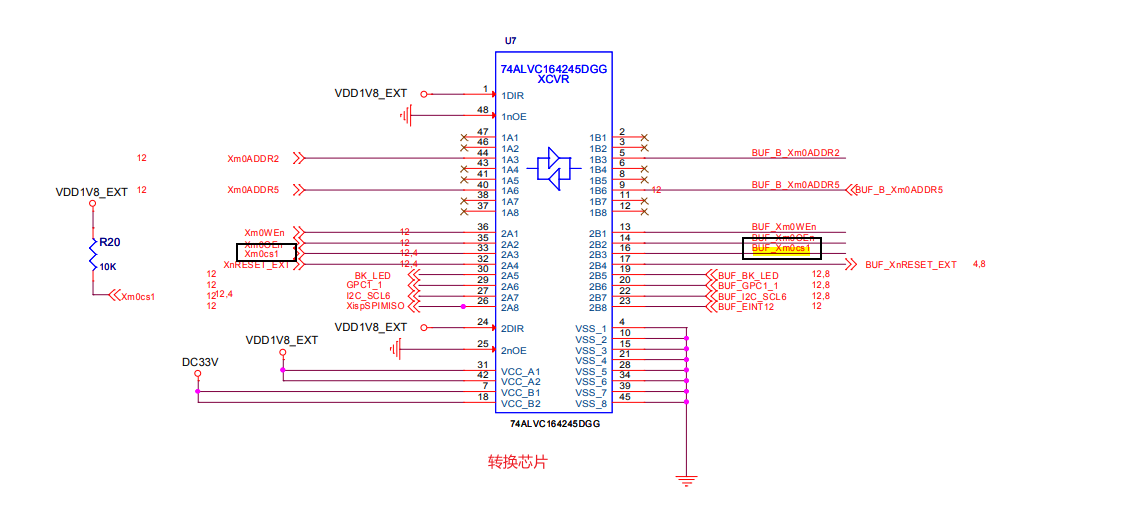
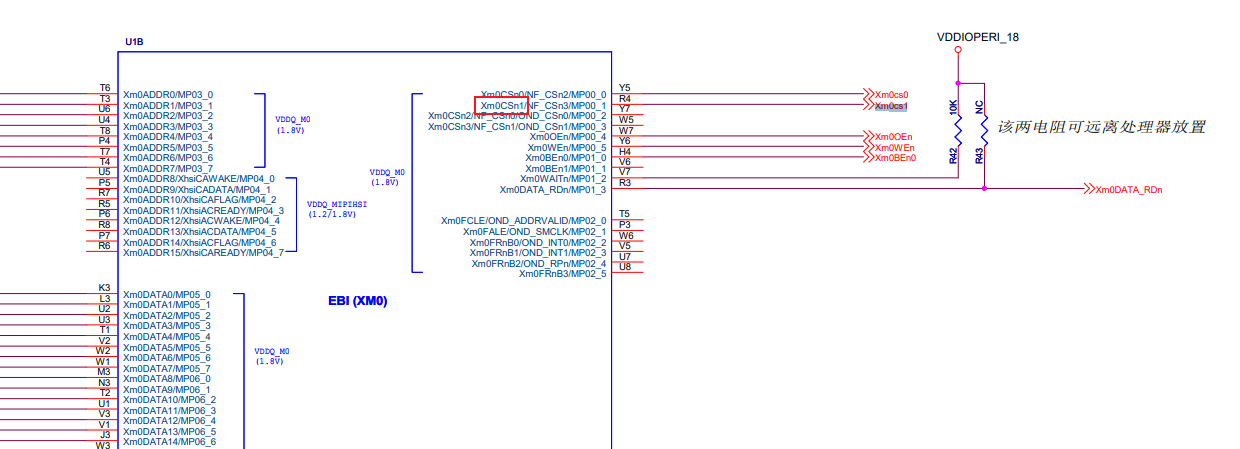
在外围电路图搜索该接口,发现已经没有了,在核心电路图上搜索该接口,找到CPU引脚Xm0CSn1
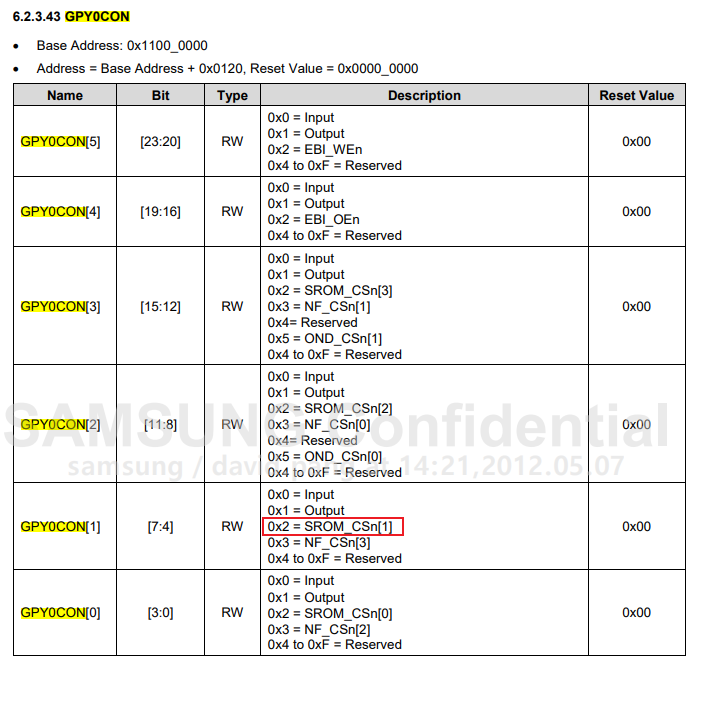
查4412三星手册,找到Xm0CSn_1对应的控制引脚GPY0_CON
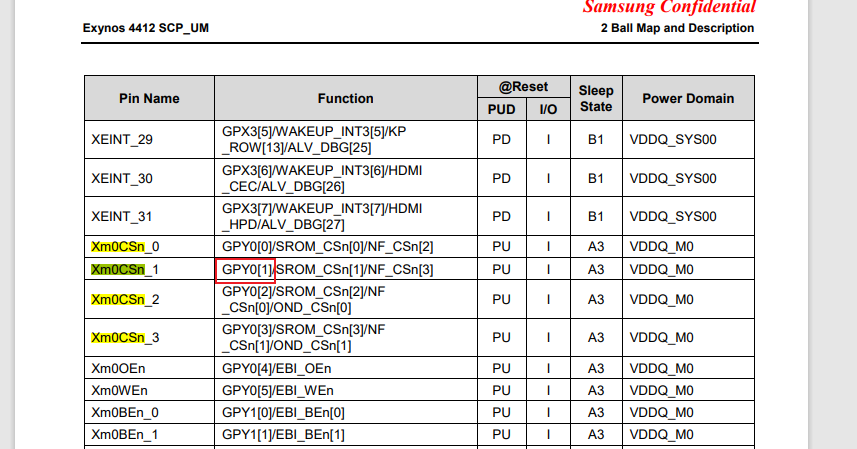
查找GPY0_CON,GPY0_CON[1] = 0x2 ,即可设置成SROM_CSN[1]模式
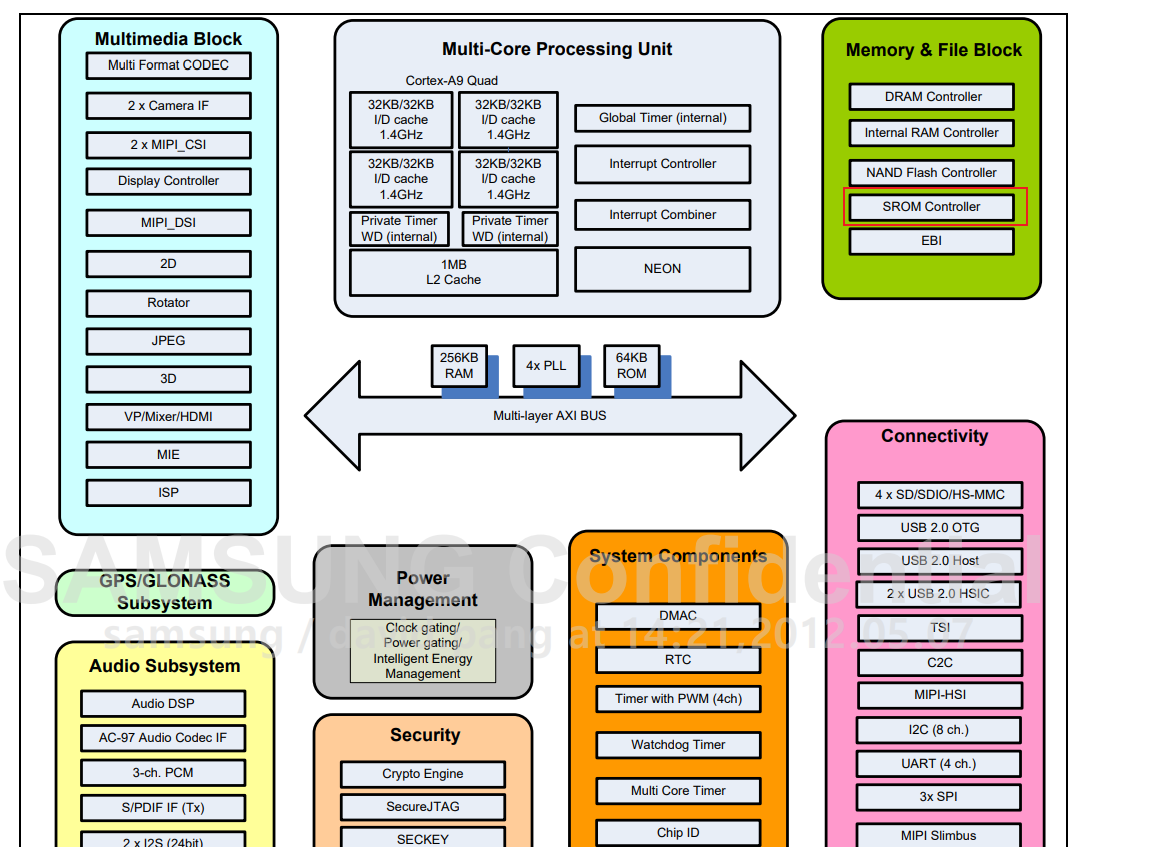
继续查找Xm0CSn_1,4412芯片通过一个SROM存储控制器链接DM900网卡。
值得注意的是,这个存储控制器SROM控制的是外部的存储器,DM900网卡内部包含了一个存储芯片,
用作缓冲区,换句话说,4412将DM900网卡看成了一个存储设备,而不是特化成网卡对待。
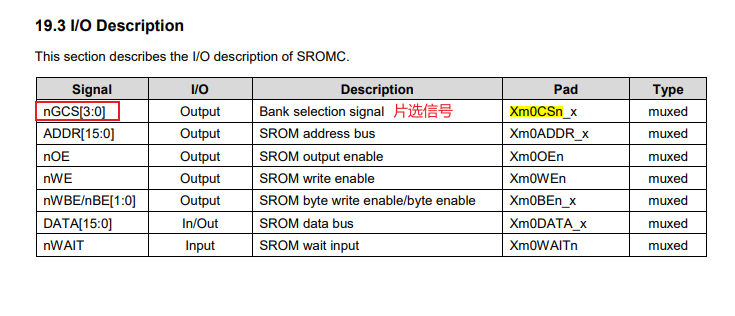
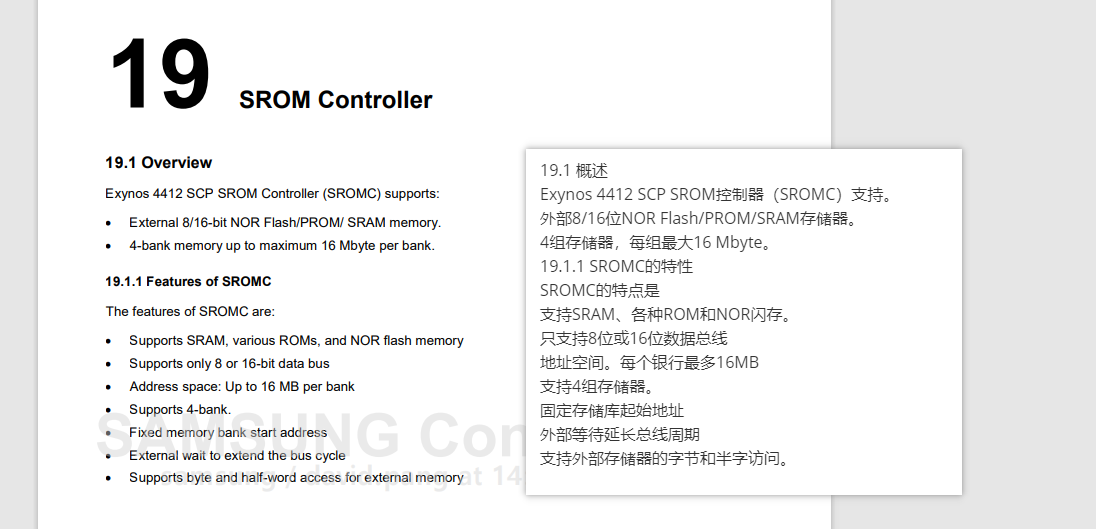
Xm0CSn1对应BANK1,查找内存映射Memory Map
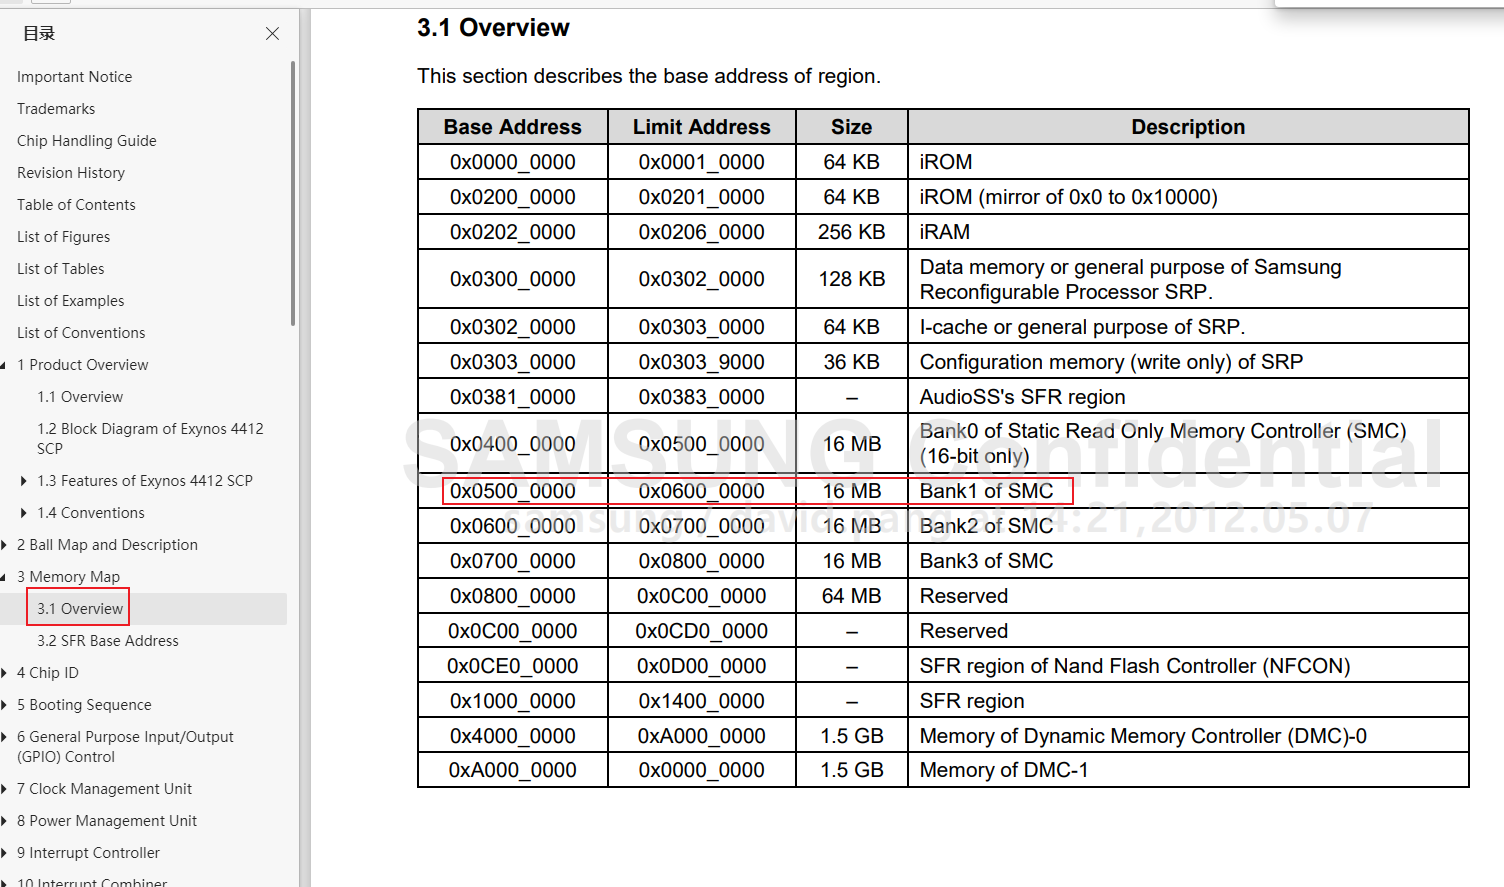
查表可知 基址0x0500_0000,极限地址0x0600_0000,长度0x0100_0000。
因此 第一部分 reg= <0x5000000 0x1000000>; -
描述网卡信息部分解析
首先到Documentation目录下查找网卡DM900的范例代码
在linux-5.4.79/Documentation/devicetree/bindings/net目录下 找到 davicom-dm9000.txt
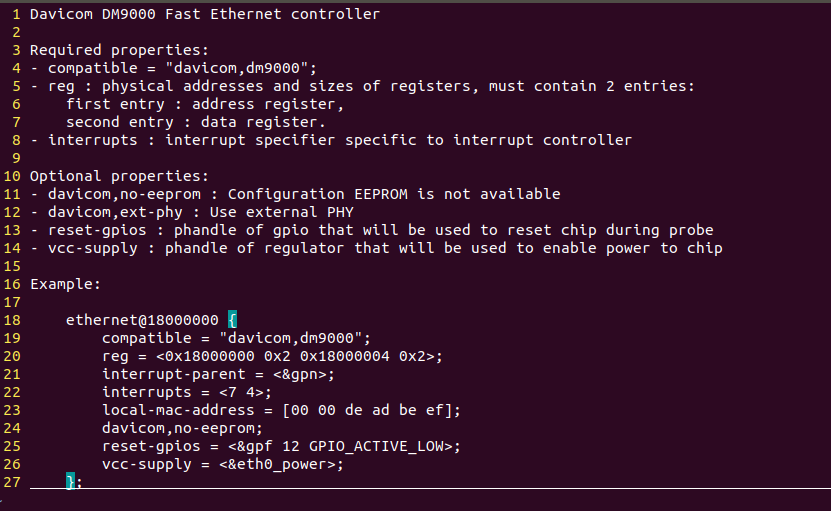
照着范例进行修改,第一行
compatible = "davicom,dm9000"; //内核通过该名字来匹配驱动
找到对应的驱动文件
/Level10/day6/linux-5.4.79/drivers/net/ethernet/davicom/dm9000.c
搜 compatible,数据保持一致就好。具体信息后续会深入研究。

reg = <0x5000000 0x2 0x5000004 0x2>;    //寄存器地址和数据宽度
参考 davicom-dm9000.txt 中的-reg 描述。
0x2是则需要看下面的电路图,数据总线是16位就是0x2,如果是32位就是0x4,8位就是0x1.
reg = <0x18000000 0x2 0x18000004 0x2>;  //照着这个修改地址得到
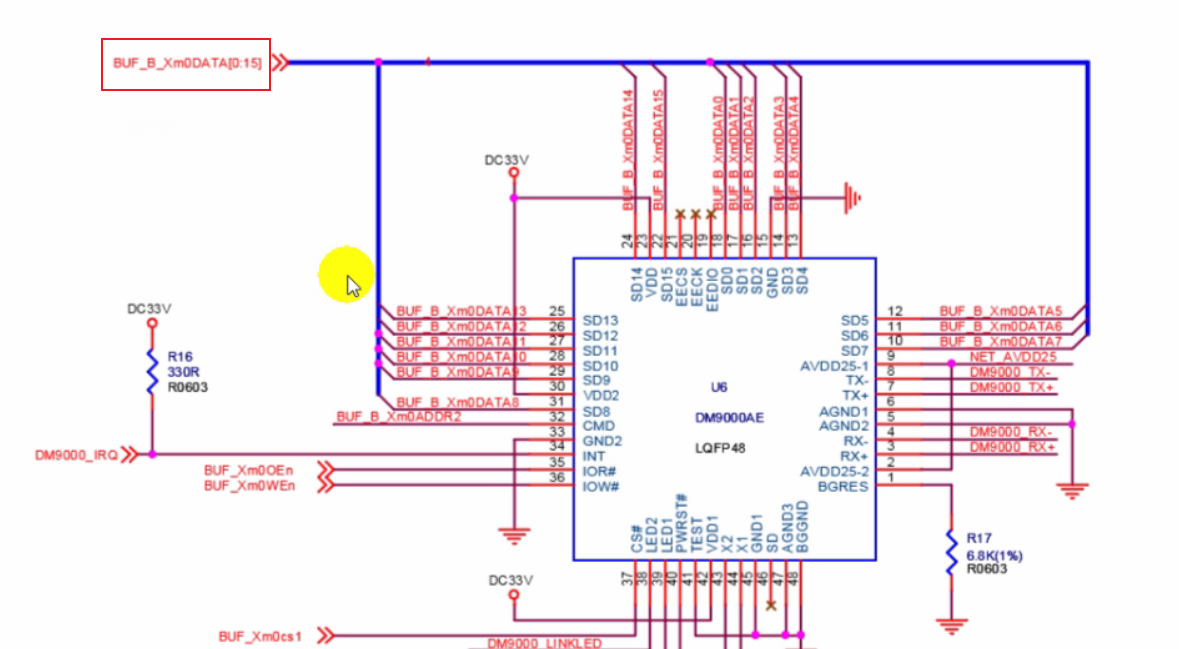
 interrupt-parent = <&gpx0>;   //继承于 中断控制器gpx0 存在的意义是利用中断提高网卡响应的实时性。
 查看DM9000芯片的INT引脚,溯源到gpx0_6,写做<gpx0>,如果是gpx1_3 就是<&gpx1>以此类推
 interrupts = <6 4>;     //6  对应中断源 DM9000_IRQ -> XEINT6 。4对应 active high
 这里的的6就是gpx0_6中的6,4表示高电平触发,和范例中保持一致,不动即可。
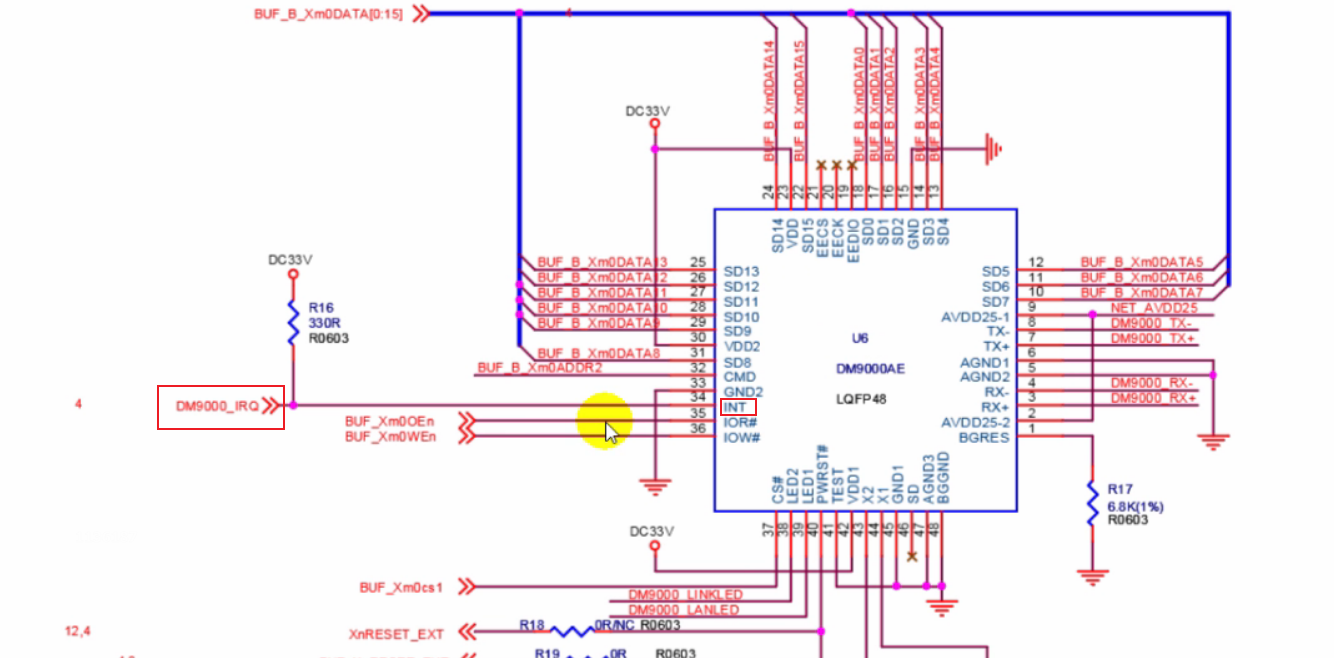

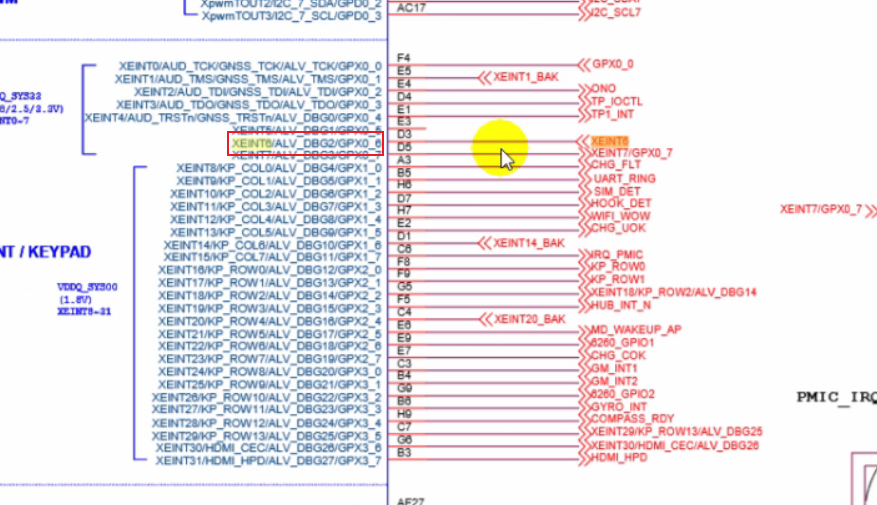
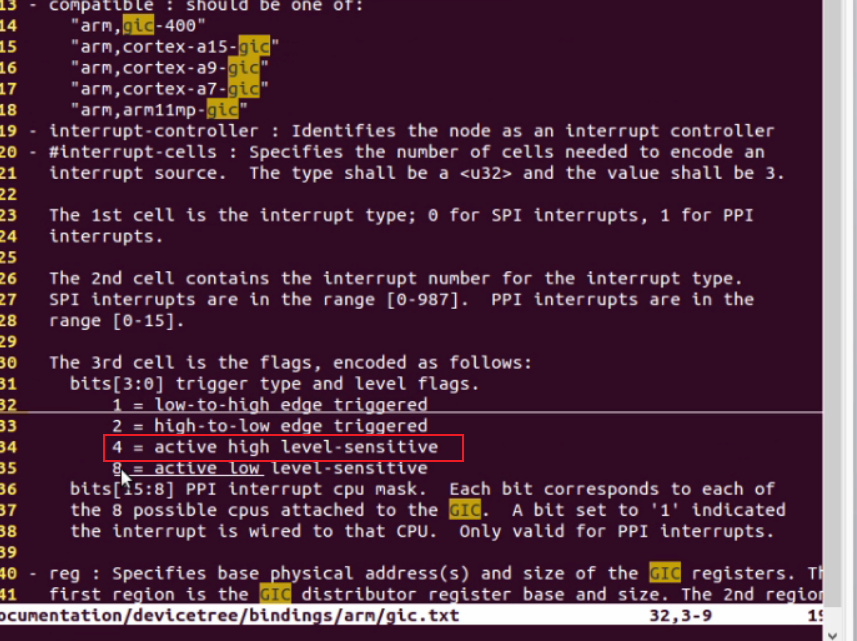
这俩保持不变即可。
davicom,no-eeprom;
mac-address = [00 0a 2d a6 55 a2];  //MAC地址