Xray管理面板+宝塔面板,Nginx反代实现 v2-ui 面板和网站共存+ 哪吒探针
0.前言
简单,快速部署vps,并实现可视化管理。
搭建环境:
ubuntu18.04
宝塔海外版
Xray,nginx,哪吒均使用最新版本即可
1. 准备工作
VPS 一台,提前重置好主流的操作系统(生产环境请别随意折腾),推荐 CentOS ≥ 7,这样宝塔插件安装更快。
域名一个(最好托管在 Cloudflare )做好解析。
自行安装 BBR 加速之类的软件。
2. 安装宝塔面板(海外版)
更新系统并重启
apt update -y
reboot
(PS:推荐大家重启的时候 ping 一下自己的 VPS IP,看看VPS是否真的重启,有部分 VPS 提示更新完成,但是后台有部分内容导致 VPS 不能软重启,这会导致下面的搭建方式出现各种问题。一定记得!一定记得!作者是搬瓦工,必须手动进入后台硬重启)
3.安装宝塔面板
(PS:强烈推荐大家使用 CentOS 系统安装宝塔面板,其他系统也可以,相关安装命令请访问 宝塔官网)
海外版网址:https://www.aapanel.com/index.html
#这里我们选用ubuntu的安装命令:
Ubuntu/Deepin:wget -O install.sh http://www.aapanel.com/script/install-ubuntu_6.0_en.sh && sudo bash install.sh aapanel

Centos:yum install -y wget && wget -O install.sh http://www.aapanel.com/script/install_6.0_en.sh && bash install.sh aapanel

Debian:wget -O install.sh http://www.aapanel.com/script/install-ubuntu_6.0_en.sh && bash install.sh aapanel
如果安装过程中,出现ssh断开的情况,就重新登录,再次执行。一直重复到成功安装。
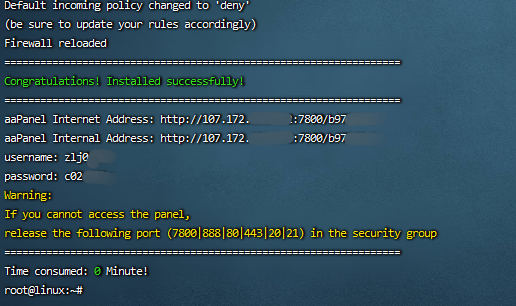
宝塔安装完毕以后,根据自己的需求安装所需的环境插件。
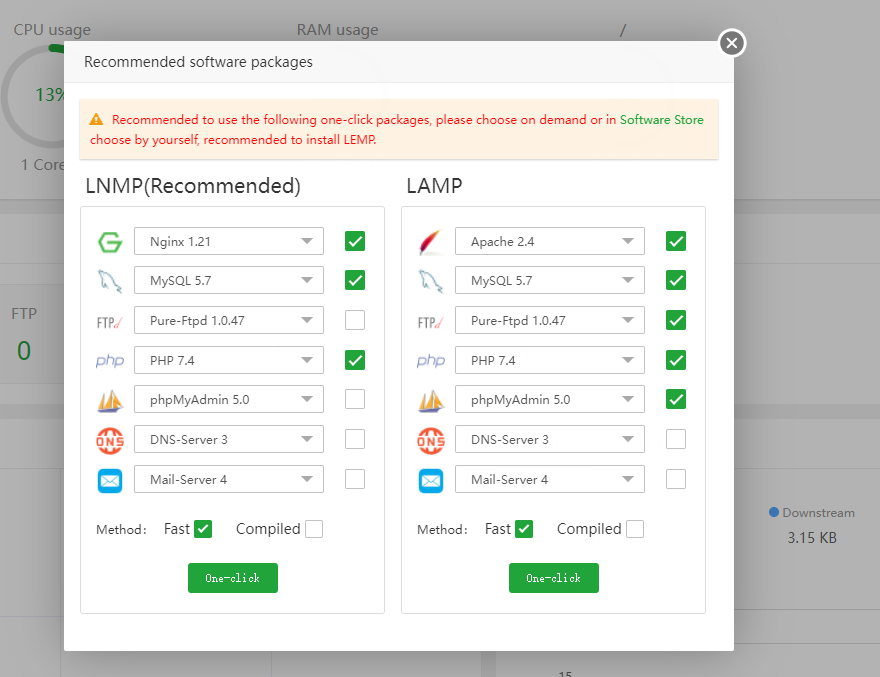 .
.
4.部署伪装网站
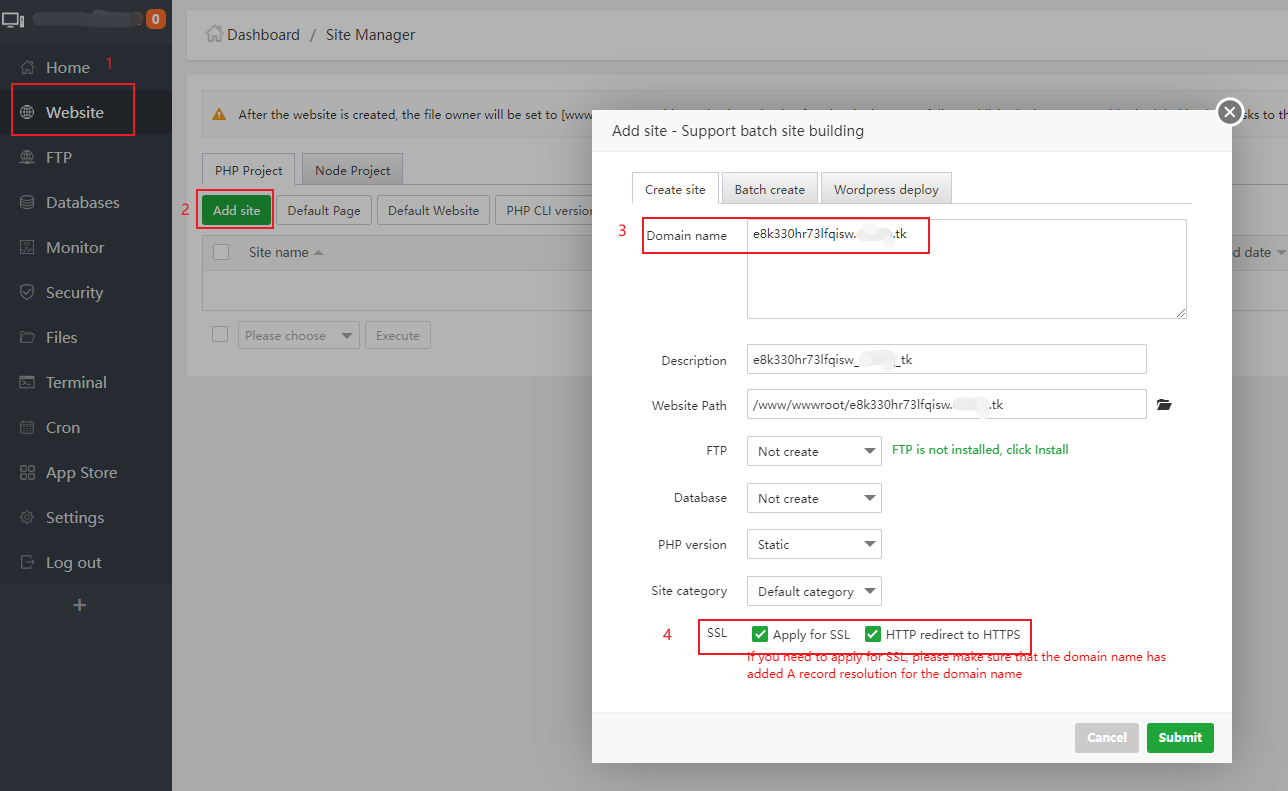
将解析好的域名填入url栏,并勾选TLS和HTTP强制转换HTTPS。

点击网页存放目录,将里面的预存网址删除掉
复制目录:/www/wwwroot/yourdomain,打开ssh,进入目录
cd /www/wwwroot/yourdomain
wget https://github.com/V2RaySSR/Trojan/raw/master/web.zip
unzip web.zip
进入主页,查看伪装网站是否搭建成功。
5.安装 Xray 可视化面板
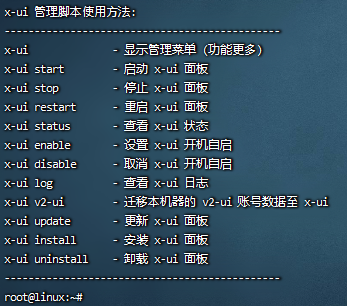
一键安装或升级脚本:
bash <(curl -Ls https://raw.githubusercontent.com/vaxilu/x-ui/master/install.sh)
6.放行宝塔面板的相关端口

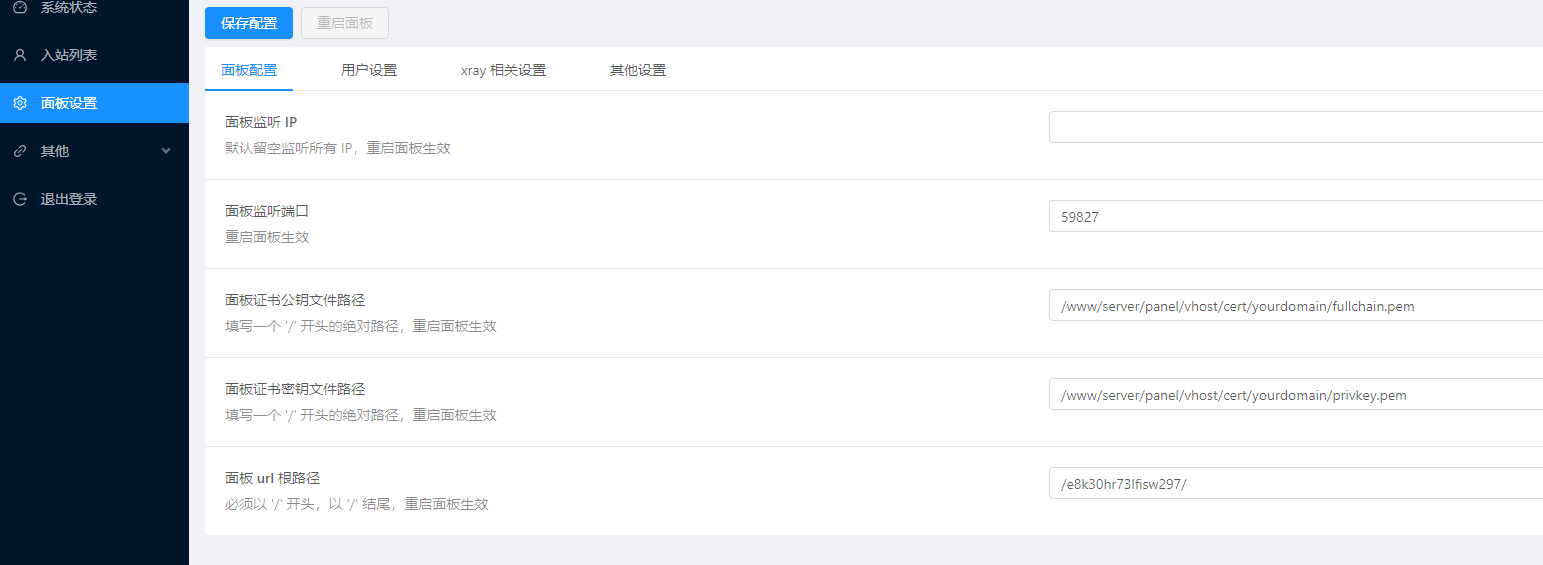
找到宝塔面板 —— 安全 —— 防火墙,放行面板的端口
使用IP:端口号访问x-ui面板
宝塔面板申请的证书在如下目录:
/www/server/panel/vhost/cert/你的域名/
7.增加科学上网节点
在面板里面找到 —— 账号列表 —— 点击 + 添加一个账号,具体设置如下图。
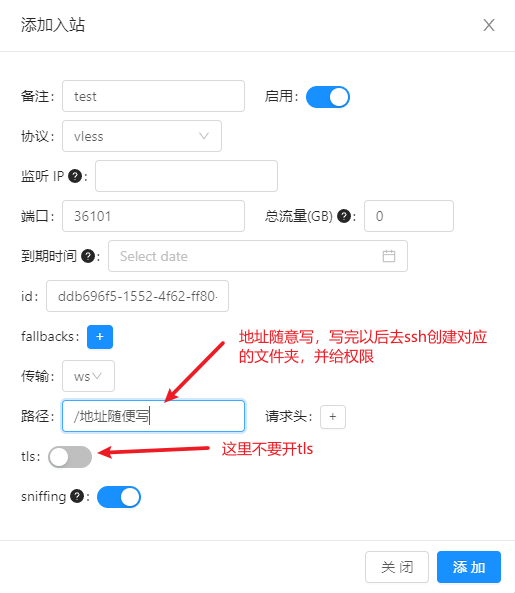
添加一个支持 CDN 的节点,不要开启 TLS,记住 端口号、路径。
8.配置 Nginx 反向代理
找到 网站设置 界面,找到 配置文件,在最后一行的 } 符号前面,新起几行,插入以下反代代码,可以对比下图。
# proxy_pass https://127.0.0.1:45454/bobo; 这里,如果xray面板设置了tls访问,那么要用https,如果没设置,使用http进行反代
location ^~ /bobo {
    proxy_pass https://127.0.0.1:45454/bobo;
    proxy_set_header Host $host;
    proxy_set_header X-Real-IP $remote_addr;
    proxy_set_header X-Forwarded-For $proxy_add_x_forwarded_for;
}
location /Date2021 {
        proxy_redirect off;
        proxy_pass http://127.0.0.1:54321;
        proxy_http_version 1.1;
        proxy_set_header Upgrade $http_upgrade;
        proxy_set_header Connection "upgrade";
        proxy_set_header Host $http_host;
        proxy_read_timeout 300s;
        # Show realip in v2ray access.log
        proxy_set_header X-Real-IP $remote_addr;
        proxy_set_header X-Forwarded-For $proxy_add_x_forwarded_for;
  }
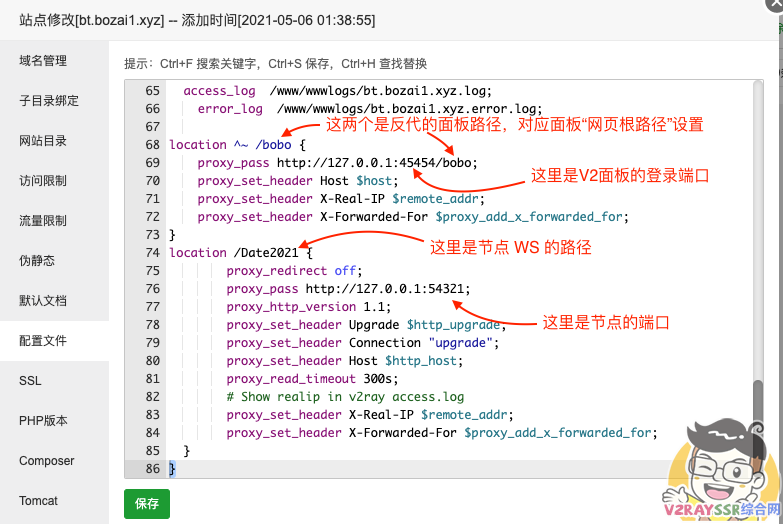
设置完毕以后,在宝塔面板里面重新启动 Nginx,是的配置生效。
至此,你可以使用 https://bt.bozai1.xyz/bobo 来访问你的 Xray 管理面板了。(这里测试了,但是没成功。不过无所谓,不重要。)
9.客户端配置,重要
注意事项:
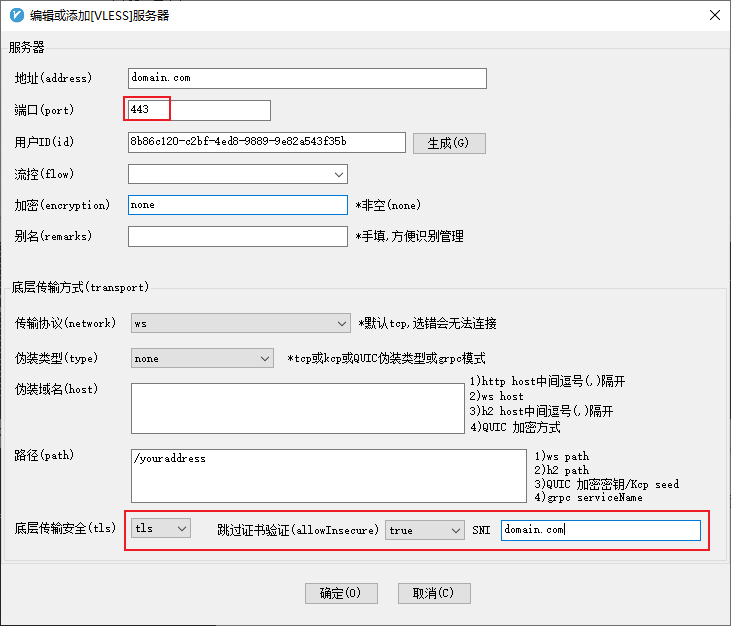
使用这种反代以后,在客户端使用的时候,二维码分享 以及 链接分享 会出问题。大家在客户端导入分享的链接以后,需要自行更改三个地方:
端口号: 443 、 路径:前面的 %2F 换为 / 、TLS 设置 :开启
9.5如果忘了宝塔面板入口:
/etc/init.d/bt default
10.哪吒监控面板搭建
作者仓库
https://github.com/naiba/nezha
准备工作
准备一个域名
注册一个github的账户
准备一条vps作为面板机器,并搭建好宝塔面板。
11.注册github
创建一个OAuth Apps,
打开:
https://github.com/settings/developers 然后点击New OAuth App按钮,填入你带套的域名
https://你的域名
https://你的域名/oauth2/callback
输入完成后,能看到OAuth Apps的Client ID和Client secrets两个数值,(其中Client secrets需要自己创建一下)保存下来。
12.部署面板
国外机
curl -L https://raw.githubusercontent.com/naiba/nezha/master/script/install.sh -o nezha.sh && chmod +x nezha.sh && ./nezha.sh
国内机
curl -L https://raw.sevencdn.com/naiba/nezha/master/script/install.sh -o nezha.sh && chmod +x nezha.sh && ./nezha.sh
选择1开始安装面板
所涉及到的数值,前面都有提到。
13.反代设置
宝塔面板无需手机登陆
echo "{\"uid\":1000,\"username\":\"admin\",\"serverid\":1}" > /www/server/panel/data/userInfo.json
进入服务器宝塔后台,创建一个站点,用你带套的那个域名。
然后网站设置,添加反向代理
location /
{
    proxy_pass http://127.0.0.1:8008;
    proxy_set_header Host $host;
}
location /ws
{
    proxy_pass http://127.0.0.1:8008;
    proxy_http_version 1.1;
    proxy_set_header Upgrade $http_upgrade;
    proxy_set_header Connection "Upgrade";
    proxy_set_header Host $host;
}
location /terminal
{
    proxy_pass http://127.0.0.1:8008;
    proxy_http_version 1.1;
    proxy_set_header Upgrade $http_upgrade;
    proxy_set_header Connection "Upgrade";
    proxy_set_header Host $host;
}
14.申请ssl
这个比较简单,直接在宝塔上完成就行。
15.被控机的安装
登陆面板机后台,添加一个主机,会生成秘钥,然后在被控机上输入代码(其实和安装主控的代码是一样的)
国外机
curl -L https://raw.githubusercontent.com/naiba/nezha/master/script/install.sh -o nezha.sh && chmod +x nezha.sh && ./nezha.sh
国内机
curl -L https://raw.sevencdn.com/naiba/nezha/master/script/install.sh -o nezha.sh && chmod +x nezha.sh && ./nezha.sh
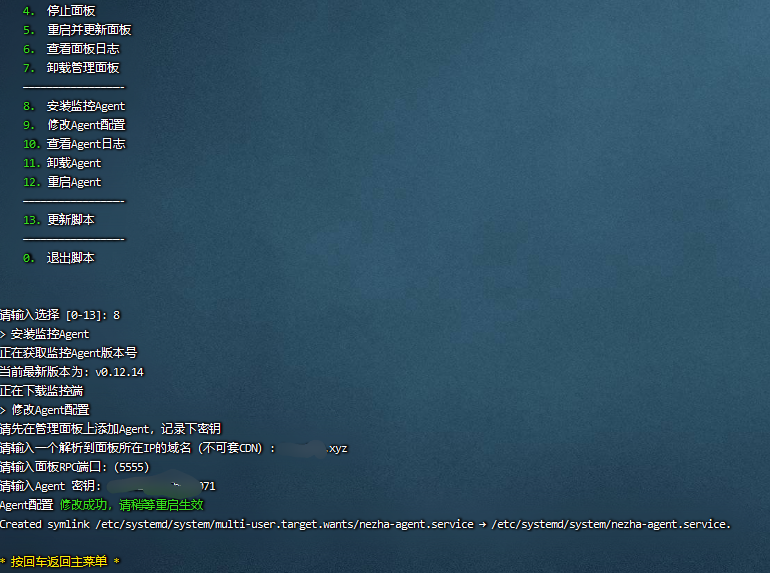
选择8,然后第一个输入你刚才不带套的那个域名,端口默认,秘钥就是刚才添加主机时的那个秘钥。
16.TG机器人设置
先申请一个机器人 @Botfather ,然后/newbot ,创建新的机器人(bot)时,会提供的 token(在提示 Use this token to access the HTTP API:后面一行)这里 'bot' 三个字母不可少;然后获取自己TG的数字Id, 和这个机器人 @userinfobot 对话可获得一串数字;这两个保存下来,一会备用。
进入面板机后台,报警——先添加通知方式,格式为
https://api.telegram.org/botXXXXXX/sendMessage?chat_id=YYYYYY&text=#NEZHA#
其中bot后面的XXX为机器人的token,chat_id为你自己TG的ID。
然后添加报警规则,常用的离线规则为
[{"Type":"offline","Duration":10}]
上面的语法为,被控机10秒内没有数据传至面板机,就视为离线,TG机器人就会通知你哪台机器离线,考虑到国内外机器的网络情况,这个数值太小,误报几率大,建议设置大一点,我设置的为300秒,相对准确,不会被骚扰。
[{"Type":"offline","Duration":300}]
设置后记得设为启动就行。
17.参考文档:
https://ybfl.xyz/180.html
https://www.v2rayssr.com/xray_v2ui_bt.html